


I’ve photographed a number of sukkahs over the years but this is the first time I’ve seen a sukkah wall covered with candy puns. My neighbour, Tali Horwitz, has been collecting puns and candy wrappers for three years. If you can read Hebrew, enjoy!


Posted by Avital Pinnick on September 24, 2013
I’ve photographed a number of sukkahs over the years but this is the first time I’ve seen a sukkah wall covered with candy puns. My neighbour, Tali Horwitz, has been collecting puns and candy wrappers for three years. If you can read Hebrew, enjoy!
Posted in Israel, Judaism, photography | Tagged: candy, puns, sukkah, sukkot | Leave a Comment »
Posted by Avital Pinnick on September 24, 2013

This decoration is an oldie but goodie. You can find tutorials for it all over the Web. It’s an adaptation of the well-known 3D paper snowflake. After this I’ll probably give the recycling crafts a rest because I’m too old to be a Mommy Blogger….
Materials:
1. Cut the coloured area of the bag into a square. My packet of chips yielded a 7″ square.

2. Fold the square diagonally in half and then in quarters. You have a little isosceles triangle.

3. Cut from one folded edge of your triangle to the other folded edge, stopping 1/4″ from the edge. This is easier to do with scissors than a rotary cutter. (I turned the folded square inside out so that you could see the cuts more easily.)

4. Gently unfold the square. You should see pairs of angled cuts.

5. Bend the two central points into a cylinder and tape.

6. Flip the piece over and tape the next set of points.

7. Flip the piece over and tape the next set of points, repeating until you’re finished.
8. Tape a piece of string to the top and you’re done!
Posted in Crafts, Israel, photography, tutorial | Tagged: tutorial | Leave a Comment »
Posted by Avital Pinnick on September 23, 2013

The last two decorations were a bit fiddly even for me, so I came up with a couple easy ones. Fortunately, I have a small stash of clean chip bags, so no calories were consumed in the making of these ornaments. At least not this year.
Remember how I said that you could flatten the creases in the bags with hot water? It’s even easier with an iron, set on “silk.” If you’re nervous about doing this, by all means try lower settings, use a press cloth, etc. Your iron may be hotter than mine and I do not want to be responsible for damaging it.

(photo above)
I think I used a family-size chip bag for this one.
1. Cut a clean chip bag into strips half an inch wide.
2. Cut the strips into the following lengths: 9, 10, 11, 12, 13, 14, 15 inches (if your bags aren’t long enough, do what you can).

3, Align the ends and lay them on top of the other, with the largest on the bottom and the smallest on the top.
4. Staple the aligned ends (if they’re a bit too slippery, use a bulldog or binder clip to hold them).

5. Fold the strips in half. with the shortest strip on the inside and the longest strip on the outside, and staple the ends together.

6. Tie a string through the top and hang.
What else could I do with all those scraps?

1. Cut a bunch of chip bags into 2 x 1/4 inch strips.
2. Thread a large-eyed sewing needle with a long, doubled piece of perle 8 cotton. Let it dangle for a while so that it untwists. Perle 8 can be quite twisty and it’s frustrating if it keeps tangling.
3. Tie a knot to join the two ends. Tie another knot about 2 inches from the first knot, to create a “stopper.”
4. Pierce a piece of chip bag with the needle and push the strip to the knot. Repeat with remaining strips, spacing the strips about 1/4″ apart. While you can thread several strips onto the needle at once, you don’t save much time doing it that way because it’s more difficult to separate them so that they have enough space to twirl and dangle.
5. When you’ve reached the end of your thread (or supply of strips or patience), tie a knot. Tie a second knot 2 inches after the first knot and cut the doubled crochet thread.

Posted in Crafts, Israel, photography | Tagged: chip bags, decorations, recycling, sukkot | Leave a Comment »
Posted by Avital Pinnick on September 23, 2013

This decoration was inspired by a cheap Chinese-made ornament hanging in our sukkah. No, we don’t eat this much junk food–I had to dip into my stash of chip bags left over from a brief fling with gum-wrapper folding (don’t ask). If you live outside Israel, I don’t know whether this will work with your local chip bags. Our chip bags are made of plastic with silver on the inside and printing on the outside.
This project works best with bags that haven’t been creased or folded for a long time. If you only have bags that have been folded (for example, your family never ever consumes junk food, so you had to beg for bags from your unenlightened neighbours and they sat on them first), you can get the worst creases out by dipping them into a bowl of very hot water.
Materials:
Instructions:
1. Cut chip bags into strips at least 5″ high and as long as the bag allows. This is important because if the fringes are less than 4 1/2 inches long, they won’t hang nicely. They’ll stick straight up like a turkey leg decoration.
2. Using scissors or a rotary cutter, cut strips starting about 1/4 inch from the top and extending to the bottom of the strip. If you’re using a rotary cutter, it’s a good idea to move each strip out of the way after you’ve cut it. This enables you to see your next cutting line clearly and to ensure that the strips are cut cleanly. If they’re stuck together, they won’t hang properly.

3. Tape a piece of paper into a tube about 1″ in diameter. I used printer paper because that’s what I had but construction paper would look nicer than white.
4. Tape a strip of fringed chip bag so that it extends over the top of the tube. In the photo below, I taped the fringe with the silver side out, so that the coloured side would be on top when the decoration was hanging.

5. Tape a few more layers of fringe, spacing each layer just below the one above it. I decided that I wanted the bottom layer to be silver, so I taped it to the paper core with the coloured side outwards. (If your secret ambition is to be a cheerleader, you can stop here and shake your brand new pom pom.)

6. When you’ve run out of bags or patience, cut the remainder of core off, just below the last chip bag.
7. Tape or glue a loop to the top of the core and hang in your sukkah.
Posted in Crafts, Israel, Judaism, photography | Tagged: chip bag, craft, decoration, recycling, sukkot, tutorial | Leave a Comment »
Posted by Avital Pinnick on September 23, 2013

I don’t photograph many neighbourhood events these days, but I happened to be at home and I hadn’t seen the children’s march organized by the Mussar Avicha synagogue in Maale Adumim. So I hiked up the hill and took a few photos.
Before the march began, the younger kids made and decorated paper flags.

Getting organized…. The bundle of sticks and cloth on the man’s shoulder is a chuppah (canopy) made from a tallit (prayer shawl) tied to four poles, traditionally used to cover a bride or a Torah scroll. The children carried toy Torah scrolls.

Music provided by a drummer:


Dancing in the Kikar Keren park. By this time it was dark and I had to use a flash. The park is lit by halogen street lamps, which looks horrid in photos.


Close to the end of the procession, at the back door of the Mussar Avicha synagogue. They turned right, went down the steps, and across the street, to finish in Rav Katz’s sukkah.

Rav Katz, seated at the far left, addresses the children.

Posted in Israel, Judaism, photography | Tagged: children, children's march, Maale Adumim, sukkot | Leave a Comment »
Posted by Avital Pinnick on September 20, 2013

My husband took the furniture out of the sukkah and washed the floor, so I was able to take this photo of the dried etrogs (and other stuff) hanging from the schach (ceiling). I had to lie on my back on the floor and use a wide-angle lens, so it’s better to do this when the sukkah is clean and empty.
Closer view of the etrogs, taken from one end of the sukkah. I stood on a chair.

Posted in Crafts, Israel, photography | Tagged: dried etrogs, etrogs, schach, sukkot | Leave a Comment »
Posted by Avital Pinnick on September 20, 2013

This is so obvious that I can’t believe I’m the first to have thought of it. If your family is like mine, you go through a lot of food over the holidays, including munchies like potato chips and corn chips. I was looking at the tinsel sukkah decorations and thinking, “There’s got to be a way to keep all those wrappings out of the landfill.” I dreamed this up a couple minutes ago and did it on my kitchen table, so this tutorial isn’t very polished.
First you need to clean the bags. I cut off the tops and bottoms and cut along the side seam. Then I lay the bag flat on the counter, wash with a soapy dish sponge, rinse, and let dry.
You’ll need at least two bags , opened and cleaned. You’ll also need a pair of sharp scissors and a stapler or tape. (Stapler works best but my staples are missing…..)
1. Fold a potato chip bag (30 gram size) in half and cut off the white section with the (non)nutritional info.
2. Fold the bag again to get a square shape (approximately) and staple the two open edges. Staples are easier and more secure than tape for this stage.
3. Cut alternating circular cuts, almost to the fold. (This will be a bit fiddly, so I don’t recommend this project for very young children because it’s difficult to repair accidental cuts and tears in a chip bag.)

4. Carefully unfold the bag so that it is flat and looks like the one below. Note: I put the tabs on because commercial tinsel garlands have them but later I cut them off because they were unnecessary.


5. Carefully staple or tape the largest rings together and open out the cut bags. You now have a tinsel garland every bit as splendid as the Christmas decorations mass-produced in China. 🙂
Posted in Crafts, Israel, Judaism, tutorial | Tagged: chip bag, decoration, garland, recycling, tinsel, tutorial | 1 Comment »
Posted by Avital Pinnick on September 18, 2013

Every year, between Rosh Hashanah and Sukkot, I have to make a couple bags like the one below. It’s about 3 inches long and a couple inches wide. I’ve made knitted bags, crocheted bags, tatted bags, needle lace bags (way too time-consuming!), and even netted bags, with a shuttle and netting gauge. The crochet ones are easiest to make, so I’ll be sticking with this model for a while.

This etrog is from last year. My husband saves etrogs from the previous Sukkot, lets them dry out, attaches a tiny label with the year (in Hebrew letters), and ties it to the schach (reed ceiling) of our sukkah the following year.

We have about 40 etrogs, since he’s been saving them every year since we were married (with a few additions when my in-laws used to come to Israel for Sukkot and now my son’s etrogs). In the photo below, the blue and orange bag is netted. The other three are tatted.

Posted in Crafts, Israel, Judaism, photography | Tagged: crocheted etrog bag, dried etrogs, etrogs, sukkah, sukkot | Leave a Comment »
Posted by Avital Pinnick on September 16, 2013

Puppet-maker Gili Marom (above)
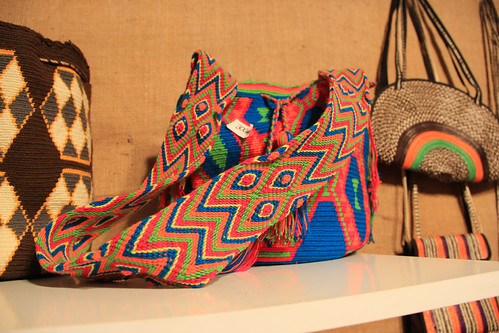
Finger-woven sashes and straps from Peru. Although they resemble card-weaving, the sellers said that it’s finger-weaving. It’s also not dense enough to be card-weaving. I suspect the technique is similar to the French-Canadian ceinture fléchée but the Peruvian technique is called “rep braiding.” The weft is diagonal, so it’s not loom-woven.

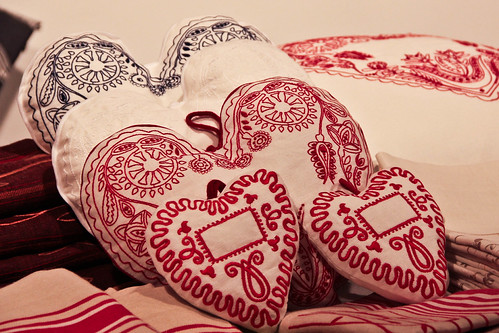
Embroidered pillows from Hungary:
We always try to go to the concert. The admission fee for Khutsot haYotser is a bit steep if you’re just going to look at the craft booths, but for a regular concert it’s a bargain. Here’s Shalom Hanoch (most of the performers tend to be on the “mature” side).

Matti Caspi, who was performing with Riki Gal. (We really wanted to hear Ehud Banai a couple days later but my husband got sick.)

Whew–finally posted all my Khutsot haYotzer photos! Sorry about the delay.
Posted in Crafts, Israel, photography | Tagged: Arts & Crafts Festival, finger weaving, International Arts & Crafts Fair, Khutsot haYotster, rep braiding, weaving | Leave a Comment »
Posted by Avital Pinnick on September 16, 2013

I photographed this woman in front of the Panama kiosk at Khutsot haYotser. I have a few shots of her smiling for me, but I liked this photo best. Look at that incredible beaded hair ornament she’s wearing. I wish I’d gotten a better look at it.
Bracelets from Peru:

Huichol beadwork from Mexico.

I bought the yellow necklace, second from the right. I hesitated at first and by the time I made up my mind (two days later), the best pieces were already gone. They really weren’t terribly expensive. The seller told me that they take about 40 hours to make (for a beginner, as long as 60 or 80 hours).

A young girl had her hair braided at the Ethiopian kiosk. One of the advantages of living in Israel is that you can photograph someone’s kid and no one objects or even notices.

And this is the woman who was braiding the girl’s hair. What a magnificent array of braids!

Posted in Crafts, Israel, photography | Tagged: huichol beadwork | 1 Comment »
