This and That

Random bits of my life

Archive for the ‘crochet’ Category

Pattern: Filet Crochet Matzah Cover

Posted by Avital Pinnick on April 24, 2012

Matzah Cover

Matzah Cover Pattern

To download a full-sze version of the chart, click the image above. On the Flickr page, right-click the image and choose Original. Click the Download link and save to your hard drive.

The matzah cover design is 11.5 inches high and 12.5 inches wide, at a gauge of 6 squares per inch. I don’t recall what thread or hook I used, but they must have been fairly fine. Mine was designed to cover a 3-compartment matzah holder for square machine-made matzah. Of course, a fabric backing or matzah holder is optional, but it gives the cover a nice finish.

The chart is 96 squares high and 85 squares wide.
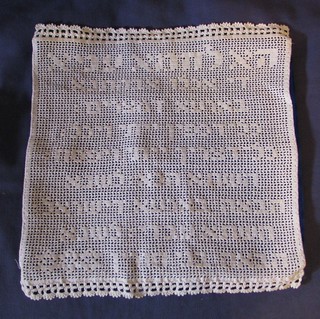
Matzah Cover, 1873

And for a little visual inspiration, here’s an embroidered matzah cover, surreptitiously photographed at the Israel Museum. It is designed to cover large round matzahs. The triangular tabs at the bottom, labeled “Kohen,” “Levi,” and “Israel” for the three matzahs representing the three parts of the Jewish people, are attached to layers that divide three compartments. The name embroidered below the crown is Avraham Shtern-something. I can’t quite make out the last two letters after the resh. Probably polychrome silk on silk satin, although I can’t swear to it because I’m going by a photo, not the actual artifact (and they’re not likely to allow me to handle the fabric, in any case). It’s almost certainly professional work, judging by the materials, the gold bullion letters, and the stones set in the crown. The ruffled lace edging looks like chemical lace.

Matzah cover

Posted in Crafts, crochet, tutorial | Tagged: , , , , | Leave a Comment »

Tutorial: How to Make a Needlework Chart with Visio

Posted by Avital Pinnick on April 20, 2012

Visio for needlework chart

Crocheted matzah cover

This year I didn’t pack my filet crochet matzah cover away right after Pesach. Someone who saw my Flickr photo requested the pattern and I decided to make it available. The only problem was that I didn’t have any charting software.

Years ago, on my Windows95 machine, I had an old copy of PC Stitch, which was adequate for charting but not ideal. To be honest, it felt like an old DOS program that had been ported into Windows, which was probably what it was. I decided to use MS Visio 2007 (part of the Office suite) to see whether it would work. Voilà — A chart in one evening!

Note: I know that some people use Excel for charting. It is easier to use and more readily available than Visio. Visio’s main strength is that it is a graphics program with a built-in grid (you’re laying your grid lines on top of the background grid lines, which don’t show in the finished drawing). You can export your finished design as a PDF or JPEG. You can re-use the grid for other designs by hiding or deleting your current design layer.

How to Make a Needlework Chart with Visio

  1. Launch Visio and open a blank block diagram, stretching the canvas until its large enough for your design by pressing Ctrl and dragging the edges.
  2. Make sure your Drawing Tools toolbar is visible (right-click the toolbars and make sure the Drawing toolbar is checked).
  3. The grid is visible by default. If it isn’t, click View > Grid.
  4. Snap-to-Grid is enabled by default. If it isn’t, click Tools > Snap & Glue.
  5. Click the Line tool on the Drawing Tools toolbar and draw horizontal and vertical red lines, 10 squares apart.
  6. Select the red lines and save them to a layer called “grid_red” (Format > Layer).
  7. Lock the “grid_red” layer (View > Layer Properties).
  8. Draw a grid of black lines. This isn’t as tedious as it sounds: Draw one black line. Duplicate (Ctrl-drag or copy/paste) them until you have 9 parallel lines positioned correctly. Select all 9 lines and group them (Ctrl-G). Copy them (Ctrl-drag) them between each pair of red lines.
  9. Save the black lines to a layer called “grid_black” and lock it.
  10. Creat another layer called Design (View > Layer Properties. Click New). Check the Active checkbox so that all things you draw from now on will be saved to that layer (this should happen anyway because you have locked the grid layers).
  11. Draw a black square, no line, to fill one of the squares. Using Ctrl-drag to duplicate the box, start filling in the letter shapes. If there are long horizontal or vertical lines, stretch the black square to fit. Copy and paste duplicate letter shapes.
  12. Save file. You can export as JPG or PDF (File > Save as).

When I’ve laundered the cover, blocked it, and photographed it properly (the photo above really doesn’t do it justice), I’ll post the pattern.

Posted in Crafts, crochet, tutorial | Tagged: , , , , | Leave a Comment »

Spiral Crochet Kippah

Posted by Avital Pinnick on February 16, 2012

Spiral kippah (in progress)

I always keep a few mindless projects going (for those times when I don’t have two brain cells to rub together). I’m doing this in double crochet, although it results in a softer kippah than usual, because the spiral shows up better with a wider stripe. I’m using perle 8 cotton (medium blue and variegated orange) and a 1 mm crochet hook. I could have used a smaller hook for a tighter stitch but I don’t enjoy embedding sharp objects in my fingers while riding in moving vehicles.

Spiral Crochet Directions

Spiral crochet is quite easy but my brief instructions presume that you already know know how to make spiral in a single colour, starting from a central ring.

First colour: Chain 5, slip stitch to form ring. Chain 2 and work 5 double crochet in ring. Drop this colour, leaving a large loop so that the stitches don’t unravel.
Second colour: Slip stitch into ring, chain 2 and work 5 double crochet in ring. Work 2 double crochet on the 2 chain of the first colour. Continue working in the tops of the stitches of the first colour until you reach the loop of the first colour. Drop this colour, leaving a large loop so that the stitches don’t unravel.
First colour: Using the loop you left, work 2 double crochet on the 2 chain of the second colour. Continue working in the tops of the stitches of the second colour.
Remember to increase so that the center lies flat. It’s difficult to give precise instructions for increasing.
When you want to finish, try to have the colours on opposite sides of the kippah. Taper off each colour by working successively shorter stitches (e.g., 3 half double crochet, 3 single crochet, 3 slip stitch, fasten off).

Other Kippot

Here are a few that I made for my son, back in the day when he would wear almost anything I made.

Intarsia Kippah

The bar mitzvah kippah was done in a type of crochet intarsia. I didn’t carry the colours all the way around. When I finished a few stitches of a single colour, I carried the colour back over to the right (i.e., to the point where it would be required on the next round). I crocheted over the loose strand on the back. It’s easier to show in a diagram than words, so that will have to be the topic of a future blog posting.

My son's bar mitzvah kippah

My son's bar mitzvah kippah

Fair Isle Kippot

I made these two Fair Isle kippot when I had a lot more time on my hands. I made up the patterns as I went along, choosing small repeats so that they would be easy to fit into the number of stitches. I don’t have patterns for these. In any case, crocheted kippot are very difficult to write patterns because the number of stitches in each row is so dependent on one’s tension. So if you really want to try this, pick up a book of Fair Isle patterns, choose some geometric designs with very short repeats (say, 3-5 stitches) and a couple colours and just have fun!

My son's baby kippot

Posted in Crafts, crochet | Tagged: , , , , | 7 Comments »

Romanian Point Lace

Posted by Avital Pinnick on February 14, 2012

Thing 25. My first Romanian Point lace motif

Today most of the world is celebrating Valentine’s day by making restaurateurs and chocolatiers rich, so I’m posting this small Romanian point lace heart. I made this sample in February 2008, when I was participating in a Thing-a-Day project. It’s always held in February, so if you’re interested, put a reminder in your calendar for next year.

Romanian point lace, also called Romanian braid lace and macrame lace, is one of the easiest needle laces to master. You crochet a flexible braid (seen around the outside of the heart in my motif), tack it down with a needle and thread to a cloth backing, and then work various lace fillings with a needle through the loops. It works up quickly because it’s such a coarse lace. My motif was worked in perle 8 crochet cotton. The only tedious aspect is crocheting miles of braid if you want to work a large doily.

Getting the braid started can be tricky. Once you’ve done a few stitches, you can work on automatic pilot for hours … days …. Sunshine Creations has produced an excellent video that explains the process. See her blog for a full tutorial.

Joanne in Manitoba has posted a clear tutorial with photos. There is also a Flickr pool.

The best book on the subject is Angela Thompson’s and Kathleen Walker’s Romanian Point Lace. Clearly written and beautifully photographed, it will keep you busy for quite a while. Every time I open this book, I want to grab my crochet hook and start churning out yards of braid.

Romanian Point Lace

Romanian Point Lace

Romanian Point Lace

Years ago a woman used to sell Romanian point lace doilies in front of the Mashbir department store in Jerusalem. Romanian immigrants in Israel made simple doilies and clusters of grapes and leaves (very similar to Irish crochet). I found a Hebrew book on Romanian point lace, published in 1987, in a used bookstore.

Posted in Crafts, crochet | Tagged: , , , , , , , | 3 Comments »

Bullion Crochet Flower: Success At Last

Posted by Avital Pinnick on February 6, 2012

Bullion Crochet Flower

This small accomplishment makes me absurdly happy. I tried crocheting the bullion (aka roll) stitch last night in this variegated cotton yarn and ended up with some impressive sculptural effects but nothing that could be identified as bullions. So I went to YouTube for tutorials and found a number of workarounds developed by clever crocheters. This video had the most elegant solution and it worked very well for me. The video is in Russian, but you don’t need the commentary. Just pick up a tapestry needle.

Posted in Crafts, crochet | Tagged: , , , | 3 Comments »

When You’re Tired of Eating Matzah….

Posted by Avital Pinnick on April 4, 2010

… you can always photograph it!

Here we have an aerial view of a matzah desert with two volcanoes in the center. Towards the end of Passover one really does feel like one is crossing an endless expanse of matzah. (Canon PowerShot S5, macro setting.)

Matzah Landscape

These shots are more typical photos of matzah, on a crocheted matzah cover that I made years ago. Also taken with a Canon PowerShot S5.

Matzah

Matzah

Just for the record (because I know someone will ask), here is the matzah cover itself. It’s my own design. The crocheted panel is tacked at the corners to a blue satin “envelope” with three compartments for the three matzahs that are used at the Seder.

Crocheted matzah cover

Tonight is the beginning of the last day of Passover. Time for me to get back into the kitchen.

Share

Posted in crochet, Food, photography | Tagged: , , , , | 2 Comments »

Finished Yoga Mat Bag

Posted by Avital Pinnick on November 8, 2009

I’m home sick today. Not swine flu but definitely something. I had some soup, crawled into bed for a few hours, emerged, and worked the final stitches of my yoga mat bag. Of course, it’s doubtful that I’ll be well enough to go to yoga class tonight! But at least the bag is finished and even the leaf points are tacked down. You may wonder, why Irish crochet? It started out as a plain mesh stitch and I thought it resembled a plain Irish crochet ground. So I added a few traditional flowers and leaves, then some tendrils (Bosnian crochet, tacked down with a running stitch).

Here’s the finished mat:

Finished Irish Crochet Yoga Mat Bag

Close-up of one of the rose and leaf clusters:

Finished Irish Crochet Yoga Mat Bag

Drawstring closure (tie in Bosnian crochet — chain 1 row, slipstitch 2nd row) and loop securing carrying strap. As I posted earlier, the carrying strap is looped around the circumference of the mat for added support and the end is sewn into a loop so that the strap fits tightly while the bag is being carried:

Finished Irish Crochet Yoga Mat Bag

Carrying Strap with loop

nablo1109.120x90

Share

Posted in Crafts, crochet | Tagged: , , | 8 Comments »

Sign of Winter

Posted by Avital Pinnick on November 3, 2009

Seen at work this morning.

Well, duh


nablo1109.120x90
NaBloPoMo

NaBloPoMo = National Blog Posting Month.

Of course, every month has its NaBloPoMo and I’m sure that the “national” does not refer to Israel, but I saw it this morning and decided to give it a try. Yes, it’s November 3. Better late than never.


Yoga Mat Bag

I’m on the home stretch of the yoga mat bag. These photos illustrate a happy accidental solution. Keep reading.

When I began the carrying strap, I worked a 9-stitch wide strip, in rows back and forth. I don’t like flat crocheted straps. The edges are ratty looking and uneven and the rows stretch a lot. So I crocheted the strap in a tube, working round and round in a spiral. It showed a slight tendency to twist, so I steamed it with a hot iron before sewing it to the bag.

Two problems appeared:

  • The strap stretched until it was much too long
  • The mat was so heavy that the side of the bag was badly distorted
  • I never thought about the fact that a yoga mat is fairly heavy!

    Solution: I cut the stitches attaching the end of the strap to the top of the bag. I sewed the strap end into a loop around the strap itself, so that it formed a loose slip knot around the circumference of the bag. This shortened the strap appreciably, gave the bag considerably more support, and moved the end of the strap closer to the middle of the bag so that the bag length was more comfortable to handle.

    Carrying Strap with loop

    I was pretty happy with this modification. When I did a couple trial runs putting the mat into the bag and taking it out again, I found the strap loop tended to slip. That realisation gave rise to the next development: a “belt loop for the strap.” I crocheted a longish chain, threaded it through two posts above and below, and tied the ends.

    Carrying Strap (back view)

    The last discovery was that they don’t call yoga mats “sticky mats” for nothing. It’s not easy getting a sticky yoga mat into a crocheted cover! The bottom corner tends to roll up and one has to squeeze the mat into the bag like a sausage into its casing. I grabbed a plastic bag, covered the end of the mat, and voilà! With a plastic bag (aka mat sock) covering the end, the mat slid easily into the bag cover.

    If I were a serious over-achiever, I’d fit and sew a slippery lining into the bag to expedite the mat’s insertion, but I’m lazy. I did, however, sew some Irish crochet leaves and flowers onto the bag. More about that later.

    Share

    Posted in Crafts, crochet | Tagged: , , , | 3 Comments »

    Irish Crochet Leaf – We Got Ridges!

    Posted by Avital Pinnick on October 28, 2009

    Irish crochet leaf

    I worked at this leaf, crocheting, ripping, crocheting, ripping, until I finally got a nice ridged effect like a picture I saw on the Web. Here’s the basic pattern. You can make it longer, work more rows, etc., to suit your needs.

    Irish Crochet Leaf

    Ch = chain
    SC = single crochet

    Row 1: Ch 15.
    Row 2: SC into 3rd stitch from hook. SC into next 11 stitches. 3 SC into last stitch of starting chain. Continuing along the other side of the starting chain, SC to end of chain. DO NOT TURN. You will have a long, skinny oval. The stitch at the very end of your funny shape is the “end stitch.”
    Row 3: 3 SC into end stitch. SC into following stitches until 3 SC from end of long oval. Ch 1 (if you want pointier leaf tips, ch3). TURN.
    *Row 4: SC into every stitch until you reach the “end stitch.” 3SC into end stitch. Continue SC into every stitch until you are 3 stitches from the end. Ch 1. Turn.*
    Continue Row 4 until you have as big a leaf as you want (usually 2 times will be plenty). For last row of leaf, work half of row 4, that is, stop at the “end stitch” and fasten the end.

    Now my discovery: work into the back of the stitches in the row below, even when it seems counter-intuitive. The vertical offset caused by working into the back of the row below causes an accordion effect. That’s how you get the nice ridges!


    Resources
    Unfortunately, my favourite Irish Crochet book, Clones Lace, by Maire Treanor, appears to be out of print. Try Abebooks but be aware that they can be rather pricey.

    Dover produces very affordable reprints of older patterns.

    These books I recommend because they teach you how to DO Irish crochet, as opposed to following patterns:

  • Masterpieces of Irish Crochet Lace: Techniques, Patterns, Instructions (Dover Needlework Series) Dillmont’s work will teach you just about everything you need to know about Irish crochet lace. The newer books like Treanor’s have more accessible and modern interpretations of traditional patterns, but Dillmont’s book has all the basic motifs, stitches, and grounds.
  • Irish Crochet Lace: Motifs from County Monaghan Eithne D’Arcy’s strong point is the wonderful assortment of bizarre and baroque Irish crochet motifs. Forget shamrocks. Some of these motifs you’ll find nowhere else.
  • If you prefer something in the “slow lane,” these books have pretty patterns:

  • Favorite Irish Crochet Designs (Dover Needlework Series) Traditional doilies.
  • Creative Crochet Lace: A Freeform Look at Classic Crochet I don’t own this book but I’ve heard good things about it. Myra Wood’s emphasis is on larger-scale Irish crochet, adapted for clothing. A good thing, since not many of us have the stamina to work an entire blouse or wedding gown in size 100 thread with a .65 mm crochet hook!
  • Share

    Posted in Crafts, crochet | Tagged: , | 19 Comments »